Render isn’t only about looks—it’s also a vital barrier against the elements. To keep it both attractive and functional, your render needs regular maintenance, irrespective of its type. Whether you have K-Rend or a traditional sand and cement finish, you need to employ the correct cleaning method to avoid damage, cracks, water immersion, or costly repairs. You need to know what type of render you have and how to care for it properly. Learn about the safe, efficient cleaning methods for K Render and traditional sand and cement—it will help you protect your home for the longest time.
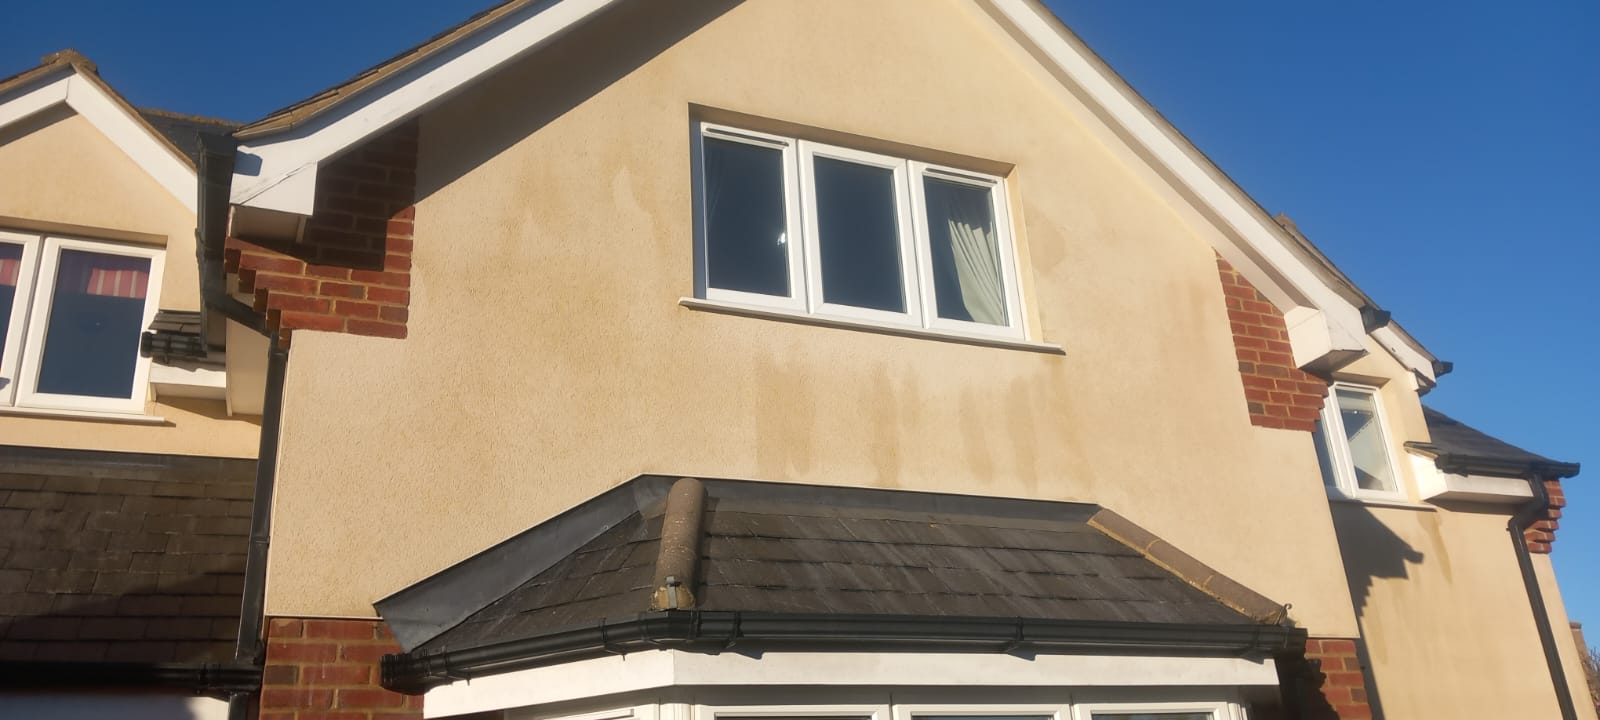
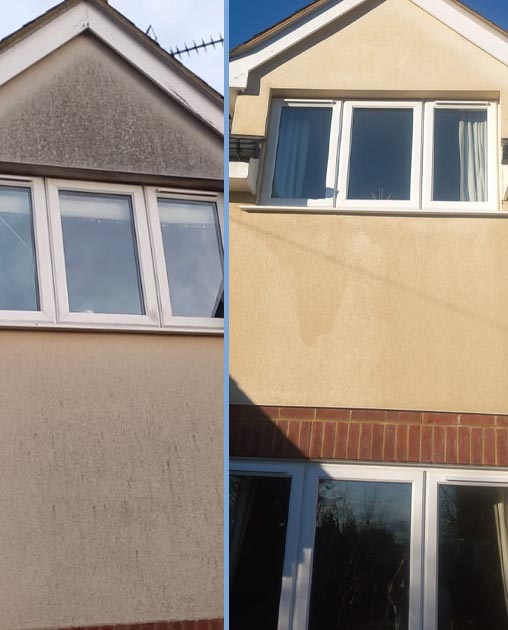
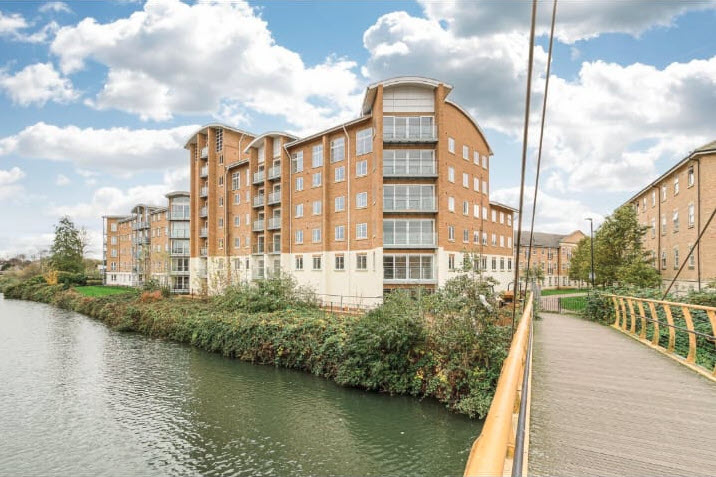
K Rend is a silicone-based render, typically made of silicone additives, Portland cement, polymers, and fine aggregates. Created for modern, low-maintenance finishes, K-Rend is a flexible, breathable, and water-resistant material. It’s widely used across the UK because of its self-cleaning properties—dirt and organic growth typically don’t cling to its surfaces.
Since it’s flexible, it has minimal cracking—perfect for the UK’s variable climate. K Rend is water-resistant, protecting the building fabric from intense rainfall. Typically, K Rend is applied to new-build homes, extensions, and renovation projects, especially those with a modern look. It works with blockwork and insulation board systems and can last for more than three decades if properly installed and regularly maintained.
Traditional render is made from sand, Portland cement, and water, sometimes with lime for more flexibility and workability. To create a smooth or textured finish, it can be applied in one or several coats on brick or block walls. It’s strong and rigid, but less flexible and breathable than modern options, such as K-Rend.
Durable for the most part, traditional render is highly porous and absorbs water when not correctly maintained or sealed. Over time, it can crack, especially if the substrate undergoes freeze-thaw cycles or shifts. Staining, algal growth, efflorescence, and delamination from the wall occur when moisture becomes trapped within the wall.
Traditional sand and cement render is common in period UK homes, especially those built between the early 20th century and the 1980s. You typically see it on suburban semi-detached houses, post-war council homes, and terraced properties. Still used in some projects, traditional sand and cement render is slowly being replaced by or overlaid with several modern systems for improved performance.
Not all render types are the same, and neither are the cleaning methods. What works for one render type might damage another—knowing which type of render you have is vital when choosing the cleaning method.
K Rend has a smooth, lightly textured finish and requires gentle cleaning because of its delicate surface and water-repellent coating. Soft washing is ideal, using a low-pressure biocide or pH-neutral cleaner and rinsing at a maximum pressure of 500 PSI. The perfect distance is a minimum of 1 meter. Using harsh chemicals, abrasive scrubbing, and high-pressure jets can strip away the silicone layers, causing long-term water ingress and discolouration.
Traditional sand and cement render withstands higher pressure washing—around 800 to 1,200 PSI—especially for removing difficult moss, algae, or efflorescence. Mild chemicals and steam cleaning can also be used. If the cleaning is too aggressive or poorly directed, the surface will crack, and water will be forced into the wall.
Using the incorrect cleaning method has several negative consequences:
Surface erosion
High-pressure washing can blast away the outer layer of both K Rend and traditional render. On K Rend, it will remove the silicone coating, and on traditional render, it will weaken its surface.
Cracking and delamination
Excessive pressure or the use of harsh chemicals can cause the hairline to widen. If it’s traditional render, water will seep in, freeze in cold temperatures, and cause the render to delaminate or fall away.
Moisture ingress and damp
When water is forced into the render (which occurs with pressure jets), moisture enters the substrate, causing mould growth, internal dampness, and damage to insulation or wall structures.
Staining and discolouration
Using the incorrect cleaners (such as acidic solutions or bleach) can cause staining or permanent discolouration. Patchy or streaked finishes may also occur due to a pH imbalance.
Biological growth acceleration
Insufficient rinsing or using the wrong chemicals can feed algae or moss. A damaged surface also provides a better grip for future growth.
Voided warranties
K Rend (modern renders, typically) have manufacturer warranties and using high pressure or unapproved cleaners will void them.
Proper render upkeep leads to significant long-term savings:
Expands the render’s durability
Regular, correct cleaning prevents surface degradation and reduces the need for re-rendering or repairs. Properly maintained render can last for more than 30 years. Neglected or improperly cleaned render typically lasts only 10-15 years.
Prevents expensive repairs
Removing algae, moss, and stains early reduces the risk of dampness, cracks, and delamination. Regular soft washing prevents structural problems that thermal bridging or trapped moisture can cause.
Protect internal walls and insulation
If the render isn’t correctly maintained, moisture will ingress and damage insulation, internal plaster, and timber framing.
Avoids paint failures and redecoration spending
Traditional renders require painting, and correct cleaning prevents paint bubbling, flaking, and staining, as well as the need for frequent repainting.
Supports energy efficiency
Sound, dry render improves insulation performance, reduces heat loss, and helps keep energy bills in check.
Maintains or increases property value
A clean, well-maintained render enhances curb appeal and ensures prospective buyers of low-maintenance needs.
Even though K Rend is low-maintenance, it doesn’t mean it never needs cleaning. Soft washing is the gold standard, as specialist cleaning solutions are applied at low pressure (lower than 500 PSI) to eliminate dirt, organic growth, and stains without damaging the render’s surface. This will break down algae, moss, and pollutants over time.
Gentle cleaning is better for K-Rend because it preserves the silicone layer, preventing surface erosion and water ingress.
Recommended Pressure Settings
Best nozzle types
Extra tip
To better control the output and avoid overpressure, use a washer with adjustable pressure settings.
K Rend is created to resist water, but it’s sensitive to acidic or alkaline solutions. When you use the incorrect type of cleaner, you risk discolouration, patchiness, and stripping away the water-repellent silicone layer. Additionally, such solutions may undergo chemical reactions with the render material, potentially degrading the surface.
This is why pH-neutral cleaners (pH around 7) are safe, efficient, and specially formulated to eliminate algae, moss, and general grime without affecting the render. Use render-safe biocides labelled as “non-caustic”, “pH-neutral” or “K Rend compatible” and stay away from bleach, acidic masonry cleaners, or high-alkaline degreasers.
Temperature aspects
For rinsing, use cool to lukewarm water (10–30°C)—hot water will soften the surface and cause streaks or microcracking.
When cleaning, the render should be cool to the touch—mild weather is best. Don’t clean in direct sunlight or during heat waves, as the cleaning agents may dry too quickly and leave marks. Freezing temperatures are also bad, as the render may become brittle and less responsive to cleaning.
Avoid using high-pressure washing, as the high-pressure jets (over 500 PSI) may strip away the silicone coating that makes K Rend water-resistant. Additionally, it can cause surface erosion, scarring, pitting, and force water behind the render, leading to internal dampness, trapped moisture, and render failure.
Also, avoid harsh chemicals and abrasive tools. Acidic or alkaline cleaners (such as brick acid, degreasers, and bleach) will break down the surface chemistry and discolour the render. At the same time, wire brushes, scouring pads, or abrasive sponges can scratch and roughen the surface, making it more vulnerable to biological growth and dirt accumulation. Additionally, harsh cleaners may react with the minerals in the render, causing blotches, streaks, or etching.
Being meticulous is vital for the best cleaning results, including render cleaning. Take the following steps when cleaning render:
1. Inspect the surface
Before you start cleaning:
2. Protect surrounding areas
Avoid collateral damage and use breathable sheeting or plastic to cover plants, soil beds, fixtures, and nearby windows. Also, ensure that water runoff does not enter drains or harm surrounding areas, especially if you use a biocide.
3. Apply an approved cleaning solution
Use a pH-neutral, render-safe cleaner designed explicitly for silicone renders, and apply it with a low-pressure sprayer or a soft wash lance. To avoid streaking, start from the top and work in sections for large areas.
4. Allow enough dwell time
The solution should be left to sit for 20 to 60 minutes, depending on the level of dirtiness and the manufacturer's guidance. Don’t let it dry completely; instead, reapply a light mist of water to maintain a damp surface during dwell time.
5. Rinse gently and inspect
Extra tip
If the render is soiled or old, apply a follow-up biocidal treatment to prevent regrowth and expand the clean finish’s durability.
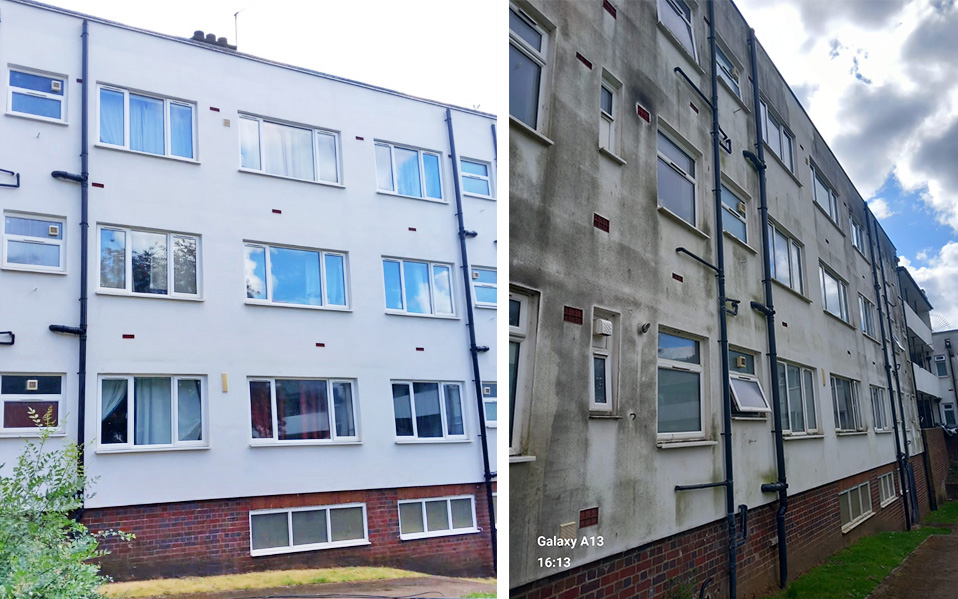
Just because traditional sand and cement render is tougher than the silicone-based system, doesn’t mean it never damages. On the contrary, its porous nature means it absorbs water and stains more easily, and old render becomes fragile. Cleaning has to be handled cautiously.
Soft washing for light maintenance
To remove surface-level algae, dirt, and pollution stains, soft damage with a biocide or mild detergent is a good choice. Low pressure, followed by a gentle rinse, is recommended. Preventing further staining and extending the external paint’s durability, soft washing is an excellent option for regular upkeep when the render is in good condition.
Controlled pressure washing
For difficult dirt and neglected render, controlled pressure washing is a good choice. However, you should use 800–1,200 PSI and a 25° or 40° fan nozzle and keep at least 1 metre from the wall. To prevent water ingress, avoid pointing the spray directly at cracks or edges, and test a small patch first—old render may crumble under pressure.
Steam cleaning (low-pressure, high-temperature)
Steam cleaning is a safe method for historic or heavily weathered render. Without overwetting the surface, steam cleaning kills moss and algae while lifting grime, but requires specialist equipment and expertise. It’s best to leave it to the professionals.
Chemical Cleaners (with caution)
For efflorescence or ingrained staining, mild alkaline cleaners are a good option. Don’t use strong acids or harsh solvents, and follow with a deep rinse to neutralise all chemical residues.
As long as it’s done with precision, pressure washing is safe to use on traditional sand and cement render.
PSI guidelines for older render
The recommended pressure, 800–1,200 PSI, is strong enough to clean, yet low enough not to erode the surface. Don’t exceed 1,500 PSI, as this risk can open microcracks, strip paint, or damage the render’s surface. Before scaling up, test on the lowest setting in a small, hidden area.
Adequate spray angles and nozzles
Use a 25° or 40° fan nozzle, as it spreads the force of water and lowers surface pressure. Avoid using 0° (pinpoint) or turbo nozzles, as they are too aggressive for rendering and may cause gouges. Never aim directly at the surface head-on, and spray at a 45° angle to minimise the risk of water immersion and impact force. This way, you also sweep dirt away better.
For safe, even coverage, keep a distance of 1–1.5 metresfrom the surface.
Tips to avoid cracking or water ingress
Traditional sand and cement render is vulnerable to wear, particularly in the UK’s damp and polluted climate. Staining, algae, and discolouration are common problems, but the correct approach may preserve the render’s look and lifespan.
Removing algae, moss, and efflorescence
Algae and moss:
efflorescence
Handling deep-set staining and discolouration
Stains from rust, pollution, or mould may seep into the porous render, and you will have to:
To avoid recurrence, always detect the source of staining (leaking downpipes, corroded fixings, etc.).
Prep for repainting post-clean
Extra tip
Before repainting, wait at least a few dry days—you risk moisture trapping and early failure when applying paint to unclean or damp render.
Have a look at our complete guide on render cleaning.
Although it’s durable, K Rend may still present cleaning challenges.
Stains from pollution or biological growth
Airborne pollution (especially in urban or roadside areas), along with algae, moss, and lichen (in damp, shaded spots), will lead to dark streaks, green patches, or uneven staining on K Rend.
How to handle it
If the problems recur, consider treating the area annually and installing gutter guards or trimming nearby vegetation.
Preserving water-repellent surface properties
Harsh cleaning may strip its water-repellent layer; therefore, you should avoid high-pressure washing, acidic or alkaline cleaners, and abrasive pads or wire brushes.
How to handle it
If render loses its water-repellent abilities, hire professionals to reapply the render-compatible water-repellent treatment.
Maintaining uniform colour in textured finishes
Textured K Rend is difficult to clean evenly, especially if the colours are light or the walls are old. In such cases, the render may appear patchy, and over-cleaned areas will appear brighter or smoother. If you use the wrong pressure nozzle, you risk stripping the threads.
How to prevent it:
Traditional sand and cement render is porous and presents specific cleaning concerns.
Moisture issues or cracks
Traditional render has a higher risk of water ingress than modern systems, especially if it’s cracked or poorly cared for. Watch for hairline cracks or significant structural splits (they allow water to seep in), damp patches or peeling paint (especially after cleaning), algae or moss regrowth.
How to handle it:
Compatibility with paints or treatments after cleaning
Old renders are often coated with breathable paints, which can fail when exposed to moisture or residue from cleaning. Can fail if cleaning leaves behind moisture or residue.
How to handle it
Avoid long-term damage from aggressive cleaning.
Many older renders don’t withstand modern pressure washing, so avoid high-pressure washers (over 1,200PSI) that may expose aggregate and blast soft mortar. Acid-based cleaners can alter the cement surface, and scraping or scouring tools can make the surface rough.
You should:
Call professionals for listed buildings or decorative finishes.
Access and height concerns
If your property is two storeys or higher, or has difficult-to-reach areas (such as gables or dormers), safety is vital. Professionals use cherry pickers, scaffolding, or safety harnesses to work securely.
Complex staining or delicate finishes
Stains from rust, pollution, or algae that have settled deep in textured finishes require specialist cleaning products and equipment. Professionals examine the render type, test the solutions, and use the appropriate products to clean. Old, painted surfaces and decorative renders may have surprising reactions to standard treatments.
Maintaining warranties or insurance cover
K Rend comes with manufacturer warranties that state incorrect cleaning will void them. If your building insurance covers the exterior, you don’t risk invalidating it by hiring a certified contractor. Request the professional cleaners' evidence of render experience, liability insurance, and method statements.
Essential safety precautions and PPE
Choosing the right equipment
To apply the cleaning solutions evenly, use soft wash sprayers. Consider the previous recommendations about using a pressure washer and enhance your reach with extension wands or telescopic poles (which can be rented or purchased).
When to stop and call in the pros
K Rend is low-maintenance, but it still requires regular maintenance, which lowers cleaning frequency, extends its durability, and prevents expensive repairs down the line. Clean K Rend every 12-24 months, depending on your location. If you live in a coastal, shaded, or high-traffic area, your render will need annual cleaning. Sheltered or rural properties require render cleaning every two years. To prevent deep staining and spreading, treat early signs of pollution or algae promptly.
Landscaping and guttering
Improve airflow and prevent damp by trimming back trees, hedges, and climbing plants. Avoid water staining or runoff streaks by installing and maintaining guttering, downpipes, and splash guards, as well as directing hosepipes, garden sprinklers, and overflow outlets away from the render.
Signs of deterioration
Discolouration or dark streaks, particularly on lighter finishes, may signal pollution or algae buildup, while surface powdering or patchiness could suggest UV wear or improper cleaning. If the walls remain wet for an extended period, the render will no longer be water-repellent and may require cleaning or even re-treatment. Always address hairline cracks or blown patches quickly.
Extra tip
Keep a photo record of the render in time so spot any subtle modifications and act accordingly.
Seasonal inspection and upkeep
Every spring and autumn, inspect the render and look for any flaking paint, damp patches, and hairline cracks. Please pay attention to areas exposed to prevailing wind and rain, and gently clean them after winter to remove algae and staining before it has a chance to settle. In autumn, prevent streaking and overflow by clearing gutters and downpipes.
Timely repairs
Don’t postpone managing small cracks or bulging render, as this increases your risk of detachment, water ingress, or internal damp. Use compatible repair mortar or hire pros for colour-matched patching. Never paint over problem areas unless you handle the underlying cause first.
Preventing moisture-related issues
Ensure that all external joins (around windows, sills, and pipes) are adequately sealed. Also, avoid planting too close to walls—dense vegetation will trap moisture and encourage moss to thrive. To allow moisture to escape and minimise freeze-thaw effects, always use breathable masonry paint.
Extra tip
After a heavy rain, keep an eye on walls—patchy dampness and slow-drying areas signal that moisture seeps in, typically through damaged render or blocked drainage.
The more you understand the expected costs of professional and DIY cleaning, the better you can budget for render cleaning.
Professional cleaning (per elevation or wall):
DIY cleaning
Factors that affect the pricing
Render type, with K-Rend often requiring specialist soft washing (due to its price). Traditional render is more flexible regarding the cleaning method, but may require preparatory work and repainting after cleaning.
Access and scale are also crucial for pricing—obviously, the costs are higher for homes with multiple storeys, difficult access, or significant elevations. Depending on duration, scaffolding or cherry pickers can add £150–£500.
The condition of the render will also impact the price, with soiled or neglected render requiring more time, solution, and effort. The prices will also increase if several treatments are necessary.
Regular, smart maintenance has long-term benefits:
Extending render lifespan
Dirt, algae, and pollutants break down protective coatings, causing cracks and rendering degradation. Regular cleaning will prevent premature ageing—K Rend will last for 30 years, and traditional render for 20 years. Preventative care also lowers the frequency of expensive repairs or full re-renders.
Enhancing curb appeal and property value
A clean, well-maintained exterior instantly improves first impressions and properties with fresh-looking, uniform render, which can command higher sale prices. They also sell faster and give the impression of overall property care.
Improving energy efficiency
Healthy, sealed walls maintain thermal performance, especially in period homes with solid walls. Damp, damaged render affects insulation and lets heat escape, increasing energy bills.
Not all cleaning contractors are created equal, so look for companies that:
Extra tip
Obtain multiple estimates and avoid relying solely on pricing when comparing. Even if a provider charges more, their diverse experience can help you avoid pricey repairs later.
When you look for a cleaning contractor, pay attention to the following red flags:

Case no.1
Homeowners used a standard pressure washer to clean their K-Rend and ended up with etching, surface pitting, and loss of the water-repellent properties. The wall started to absorb water and discoloured unevenly. The homeowner had to pay more than £2,000 for repairs and reapplication.
Case no.2
An inexperienced contractor used a bleach-based cleaner on a traditional sand and cement render, which stripped paint and led to white salt-like streaks (efflorescence). The home had to be repainted and the render sealed.
“Our house looks brand new!” Nathalie, Sheffield
Professionals used soft washing to clean the K Rend, and the homeowner noted, “We were preparing to repaint, but the render cleaning saved us thousands. It was worth it!”
“I regret not calling in the help sooner”—David, Manchester
Davide opted for the DIY cleaning method to clean his traditional render, which had become covered in moss. Professionals applied eco-friendly treatment and low pressure to clean the surface safely. “Next time, I will hire professionals right from the start”.
Remember that a clean render is an efficient and functional one that protects your home’s integrity, value, and durability. Using the correct method will make a difference between a fresh, durable finish and expensive damage, regardless of whether you have K Rend or traditional sand and cement. Taking a render-specific approach is always a wise move to make your render last for the longest time. Ready to act?
RESOURCES